Setting up Nearmap Sync in ArcGIS Enterprise v11.1 or higher
Setting up Nearmap Sync is a simple process. The instructions in this article will take you through this process.
IMPORTANT: Nearmap Sync must not be made available to any third party, including via any public website. Please refer to terms and conditions of use for details.
To configure Nearmap Sync:
- Log in to the ArcGIS Enterprise - Portal.
- Select Content, MyContent.
- Click New Item.
- In the New Item page, select Application. The New Item page is displayed.

- Select Experience Builder widget.
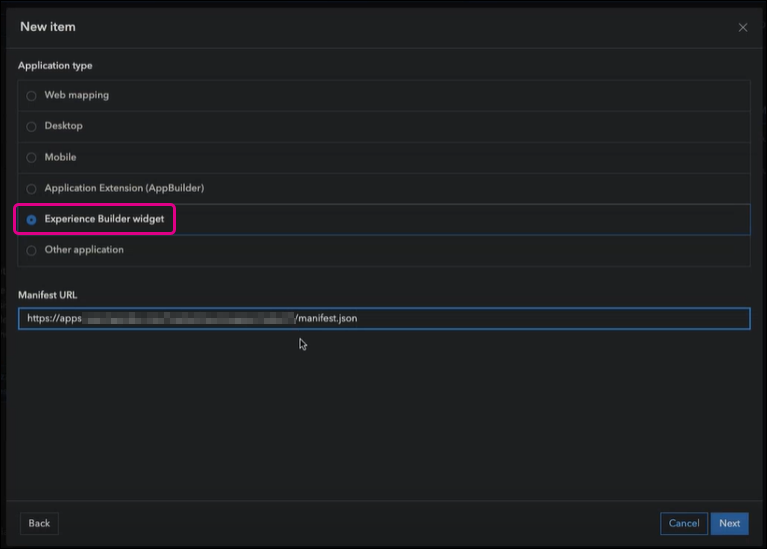
- Set the Manifest URL to:
https://apps.nearmap.com/nearmapsync/exb/v1/manifest.json - Click Next.
- Provide a name for the new item in the Title field. Complete the other details if required.
- Click Save. You'll see the widget you just created listed in the MyContent tab. You can now configure the Nearmap Sync widget using the instructions in the following section.
NOTE: Experience Builder must be installed as the "Portal" administrator can only register the Nearmap Sync widget with ArcGIS Experience Builder. This is for the Portal 11.1 + versions only.
Refer to the instructions in this article if you need more information.
Configuring the Nearmap Sync widget
- Open Experience Builder in a browser in order to configure the widget.

NOTE: If you are using ArcGIS Enterprise 10.6 to 10.9.1, unzip the Nearmap Sync zip file to the ArcGIS Experience Builder client you installed on the external web server. location client/your-extensions/widgets/nearmapSync. The zip file contains files to run the Nearmap Sync application. If you are using ArcGIS Enterprise, the files will be automatically placed in the widgets folder.
NOTE: You'll see this as Nearmap Sync in the Custom section of Experience Builder.
- Log in to Experience Builder using your ArcGIS credentials.
- Click Create new in the top right.
- Select the Blank fullscreen template and click Create.

- Drag and drop the Map app on to the canvas.

- Set the initial view to the location you want to view when you run Nearmap Sync.
- In the Content pane, select the Custom option in the Initial view section.
- Click Modify. The Modify initial view dialog is displayed.
- Click in the Search box and type the address or location in it. Click OK.

- Set any additional parameters for the app.
NOTE: For ArcGIS Enterprise 11.0 + releases, check that your IT department has correctly set up the web server as outlined in the section "Host a custom widget on a web server" in the article Add custom widget. - Re-size the map widget as required.
- In the Insert widget pane, scroll down to the Custom section.
- Drag and drop the Nearmap Sync widget (created in Experience Builder) on to the map as shown below.

- Set the Display Method to popup or embedded in the Content pane on the right. Note that you need to allow popups for this widget if you select popup.

- Select the Base Layer you want to display in the map from one of the options below:
- nearmap-vertical: To display vertical imagery
- nearmap-panorama: To display panoramas
- nearmap-3d: To display 3D mesh
- nearmap-true-ortho: To display True Ortho
- nearmap-roads: To display roads
- Click Register App. The Nearmap Sync Setup Wizard is displayed.

- Complete the requested information.

- The ArcGIS sharing root URL is automatically populated.
- Provide the Nearmap Org ID. This is required only if you have defined multiple organizations in ArcGIS.
- Click Click here. You will be taken to the MyAccount Widgets page.
- Complete the widget setup in MyAccount. Copy the Unique Widget URL that's automatically generated for you.
- Switch to Experience Builder.
- Paste the copied widget URL in the step 4 of the wizard.
- Click Complete Setup.
- Click Save.
- To preview your widget, click Live view.

- You'll now see the Nearmap imagery for the selected location next to the map widget.

- Click Publish.
When you pan or zoom to a location on one map, the other one is automatically synchronized.
